
Getting started with Tailwind CSS means setting up your project in a Node.js environment, pulling in Tailwind as a dependency, and generating a couple of config files. The most direct route is using the Tailwind CLI, which crunches all your utility classes down into a single, static CSS file—perfect for performance.
Why Tailwind CSS Is Dominating Web Development

Before we get into the nitty-gritty of the installation commands, it’s worth taking a moment to understand why so many developers are switching to Tailwind CSS. Unlike component-based frameworks like Bootstrap, Tailwind is built on a utility-first philosophy. This gives you a massive set of low-level utility classes you can apply directly in your HTML to build completely custom designs.
The beauty of this approach? You get total control without the headache of overriding opinionated, pre-built component styles. Instead of fighting with a framework's defaults, you’re simply composing your UI from small, single-purpose classes.
Unlocking Speed and Maintainability
This utility-first model naturally leads to faster development. You can prototype and build out interfaces incredibly quickly, often without ever leaving your markup to write a single line of custom CSS. It also makes for a much more maintainable codebase because styles are located right next to the HTML they affect, making components self-contained and dead simple to understand.
Here’s why this is such a big deal in practice:
- No More Naming Conventions: Forget spending ages trying to come up with the perfect class name like
.card-header-titleor.user-profile-avatar. - Global Changes Are Safe: Since classes are applied locally to components, you can refactor with confidence, knowing you won’t accidentally break something on a totally different page.
- Your CSS Stops Growing: With traditional CSS, stylesheets just get bigger and bigger as you add features. With Tailwind, you’re constantly reusing existing utilities, which keeps your final CSS file size tiny.
The real magic here is the incredibly small production build size. Tailwind's Just-In-Time (JIT) compiler scans your template files and generates only the CSS classes you’re actually using, often shrinking the final bundle to under 10KB.
A Modern Framework for a Modern Web
Tailwind's massive growth isn't just a fleeting trend; it’s a direct response to what modern development demands. As of 2025, it has cemented its place alongside the most established frameworks, with giants like Netflix and GitHub using it to streamline their design workflows. The recent release of Tailwind CSS 4.0 brought even more performance improvements, making it an even clearer choice for new projects.
This unique mix of control, performance, and developer experience is exactly why a Tailwind CSS install is the first step for so many developers starting a new project. To see how it stacks up against the old guard, check out our deep dive on how Tailwind compares to Bootstrap.
Getting Started with the Tailwind CLI
For the vast majority of projects, the Tailwind CLI is your fastest ticket to getting up and running. It’s a slick, self-contained executable that handles all the heavy lifting of compiling your CSS. This gives you a lean, production-ready stylesheet without getting bogged down in a complex build process.
First things first, you'll need a project already set up with Node.js and npm (or your package manager of choice). Pop open your terminal in the project's root directory. We're going to install Tailwind CSS as a development dependency—an important distinction, since it's a build-time tool that your final production code doesn't need.
Fire off this command:
npm install -D tailwindcss
This command snags the Tailwind package from the registry and tucks it neatly into your devDependencies inside package.json. With that one line, the foundation for your Tailwind CSS install is officially in place.
Generating Your Configuration Files
Now that Tailwind is part of your project, the next move is to generate its configuration file. This file, tailwind.config.js, is the heart and soul of your project's styling. It's where you'll define custom colors, tweak your theme, and, most critically, tell Tailwind which files to scan for utility classes.
Back in your terminal, run this:
npx tailwindcss init
Executing this command creates a minimal tailwind.config.js file right in your project's root. This is a huge leg up in modern Tailwind versions, especially with the move towards a zero-config start. The file it generates is clean, simple, and ready for you to tailor to your project's specific needs.
A common tripwire for newcomers is messing up the
contentarray. This array is what tells Tailwind’s Just-In-Time (JIT) compiler which files to watch. If a file isn't listed here, any Tailwind classes you use inside it will be completely ignored and won't make it into your final CSS.
Configuring Template Paths and CSS
Go ahead and open that new tailwind.config.js file. Your first job is to populate the content array with the paths to all your template files. Getting this right ensures every class you use actually gets compiled.
For instance, if all your HTML and JavaScript files live in a src folder, your config should look something like this:
/** @type {import('tailwindcss').Config} */
module.exports = {
content: ["./src/**/*.{html,js}"],
theme: {
extend: {},
},
plugins: [],
}That glob pattern, "./src/**/*.{html,js}", is a concise way of telling Tailwind to scan every single .html and .js file inside the src directory, including any subdirectories.
Next, you need a main CSS file. I usually call mine src/input.css to keep things organized. Inside this file, you’ll add the special @tailwind directives. These are just placeholders that Tailwind finds and replaces with its generated styles during the build process.
@tailwind base;injects Tailwind's foundational styles and any base styles from plugins.@tailwind components;brings in Tailwind's component classes.@tailwind utilities;injects the massive library of utility classes.
So, your input.css file should contain just these three lines:
@tailwind base;
@tailwind components;
@tailwind utilities;With your config file set and your source CSS created, you're ready to compile. The build command instructs the Tailwind CLI to scan your content files, work its magic, and spit out a finished CSS file. For development, you'll want to add the --watch flag, which tells the CLI to keep running and automatically recompile your CSS every time you save a file.
Pairing Tailwind CSS with Modern Frameworks
The Tailwind CLI is great on its own, but the real magic happens when you pair it with a modern JavaScript framework. Think React, Vue, Next.js, or Svelte—their component-based approach is a perfect fit for Tailwind's utility-first philosophy. This combination lets you build self-contained, easy-to-maintain UI components with styles that live right alongside the markup.
You’ll find that the setup is surprisingly consistent across these frameworks. It almost always boils down to installing Tailwind as a PostCSS plugin. Since most modern build tools like Vite and Create React App already use PostCSS under the hood, the whole process feels incredibly native. Tailwind just slots right into your existing development server and build pipeline.
Tailoring Your Tailwind Install for Frameworks
No matter which framework you pick, the fundamental steps are pretty much the same. You'll start by installing tailwindcss, postcss, and autoprefixer as dev dependencies. Next, you'll generate your tailwind.config.js and postcss.config.js files.
But here's the most critical part: getting the content array in tailwind.config.js configured just right. This is how you tell Tailwind which files to scan for classes.
Here’s what a typical configuration might look for a Next.js project:
/** @type {import('tailwindcss').Config} */
module.exports = {
content: [
"./pages/**/*.{js,ts,jsx,tsx,mdx}",
"./components/**/*.{js,ts,jsx,tsx,mdx}",
"./app/**/*.{js,ts,jsx,tsx,mdx}",
],
theme: {
extend: {},
},
plugins: [],
}See how it’s looking for .jsx, .tsx, and .mdx files inside specific folders like pages, components, and app? This precision is exactly what Tailwind’s Just-In-Time (JIT) engine needs to find every single class you use and generate the leanest CSS file possible.
For a deeper dive, check out our guide on how to install Tailwind CSS in a React project, which walks through these steps in detail.
Dodging Common Integration Pitfalls
One of the first roadblocks developers hit is styles not showing up. I can tell you from experience, 99% of the time, the culprit is a wrong path in the content array. If you miss a file extension or a directory, Tailwind won't see the classes in those files, and they won't make it into the final build. Always double-check your file paths against your project structure.
Another small but crucial step is importing Tailwind's base styles. You need to add the @tailwind directives to your main global CSS file, which might be globals.css or index.css. This file then gets imported into your application’s root, like _app.js in Next.js or main.jsx in a Vite-powered React app.
Luckily, the official Tailwind docs have excellent, framework-specific guides to get you up and running.
This screenshot just shows a fraction of them. They cover everything from Next.js to Laravel, providing boilerplate configs and exact terminal commands. These guides are invaluable for taking the guesswork out of the initial setup.
If you get two things right, you'll have a smooth experience. First, correctly tell Tailwind where to find your classes. Second, make sure its CSS is properly imported into your app's main entry point. Nail those, and you're golden.
This integrated approach is clearly the way forward. In fact, many predict Tailwind CSS will overtake Bootstrap as the framework of choice by 2025, largely thanks to its flexibility and performance. Its seamless fit with JavaScript frameworks is a huge part of that, offering a workflow that just feels more in sync with modern development. The first step in so many new projects today is a tailwind css install.
Choosing the Right Installation Method for Your Project
Picking the right way to tailwind css install isn't about finding a single "best" option. It’s about matching the tool to the job. The size of your project, its complexity, and the tech you're using will all point you toward the most efficient choice, whether that’s the CLI, a PostCSS integration, or the Play CDN. Getting this right from the start can save you a world of hurt later on.
Before you jump in, it’s always a good idea to brush up on the key considerations for website development. A simple static site has completely different needs than a massive application built on a JavaScript framework, and your installation choice should absolutely reflect that.
This decision tree gives you a quick visual guide for that first big choice.
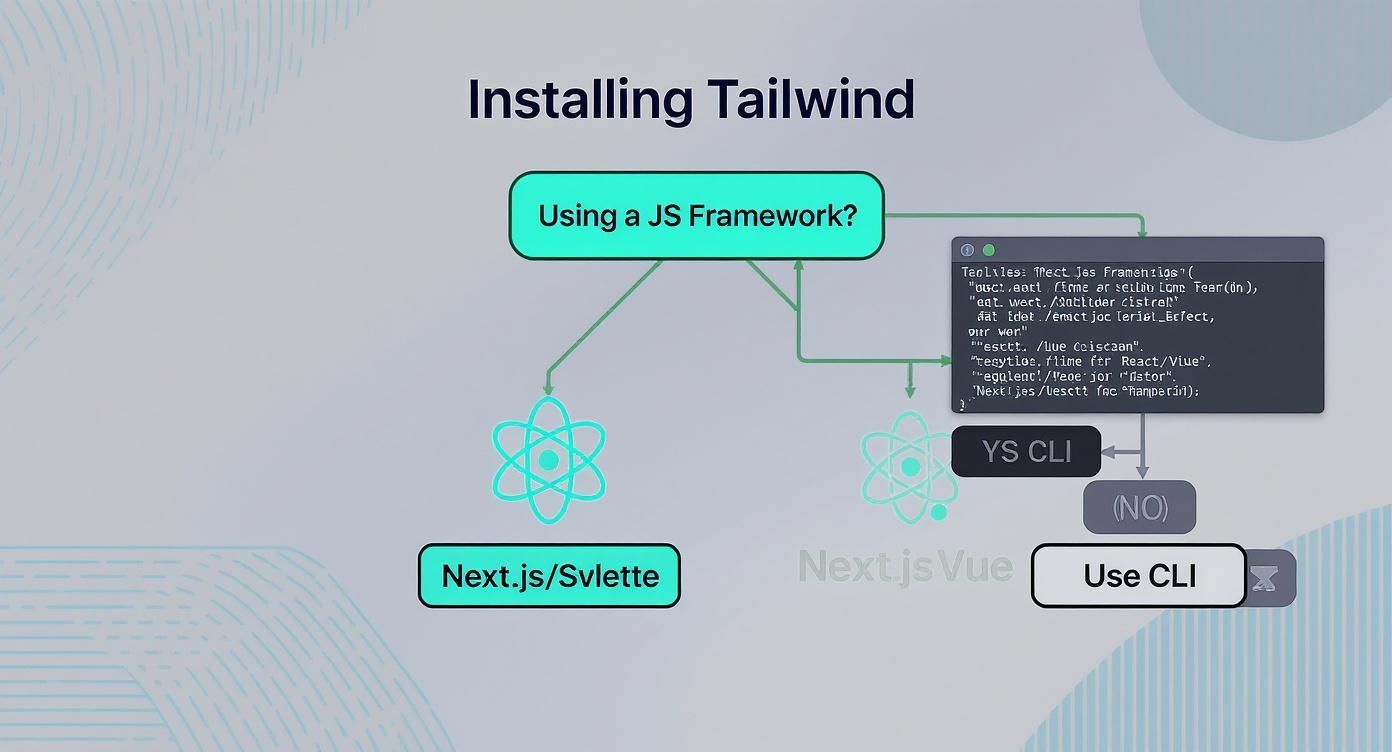
As you can see, there's one major fork in the road: if you're working with a modern JavaScript framework, integrating Tailwind as a PostCSS plugin is pretty much the standard path. It just makes for a smoother development workflow.
To make the choice even clearer, here's a quick breakdown of how these methods stack up against each other.
Tailwind CSS Installation Method Comparison
| Method | Best For | Pros | Cons |
|---|---|---|---|
| Tailwind CLI | Simple projects, static HTML sites, or projects without an existing build pipeline. | Standalone and easy to use. No complex setup required. Great for getting started quickly. | Lacks integration with other CSS tools. Can feel disconnected from framework build processes. |
| PostCSS Plugin | Projects using modern JavaScript frameworks (React, Vue, Next.js) or a custom build process. | Integrates seamlessly into existing build tools. Allows use of other PostCSS plugins like autoprefixer. The industry standard for production apps. | Requires a bit more initial setup and configuration within your project's build system. |
| Play CDN | Rapid prototyping, quick demos, tutorials, and learning Tailwind's classes. | Zero installation. Just add a single script tag to your HTML. Instantly start using Tailwind classes. | Not for production. Slower performance due to in-browser compilation. No access to customization or plugins. |
This table lays it all out, but let's dig into the "why" behind these recommendations.
CLI vs PostCSS Plugin
The Tailwind CLI is a standalone tool that’s perfect for simpler setups. Think static HTML sites, a quick landing page, or any project where you don’t have a complex build process humming in the background. It's a direct, no-fuss way to compile your CSS with a single command.
On the flip side, using Tailwind as a PostCSS plugin tucks it right into a larger build process. This is the way to go for projects built with frameworks like React, Vue, or Next.js because their build tools (like Vite or Webpack) are already using PostCSS. This approach unlocks the ability to chain other PostCSS plugins, like autoprefixer, creating a much more powerful and automated workflow.
Your choice between the CLI and PostCSS really boils down to your build system. If you already have one that uses PostCSS (and most modern frameworks do), the plugin is the natural fit. If not, the CLI gets the job done simply and effectively.
When to Use the Play CDN
The Play CDN offers a third, completely different approach. By dropping a single <script> tag into your HTML, you can start using Tailwind classes without any build step whatsoever. I've found this to be incredibly handy for a few very specific situations:
- Rapid Prototyping: When you just want to mock up a UI idea directly in the browser.
- Demos and Tutorials: Perfect for creating simple examples for a blog post or documentation without requiring a whole project download.
- Learning: It's a fantastic, zero-friction way to experiment with Tailwind's classes.
But—and this is a big but—the CDN is not meant for production use. It works by compiling your CSS in the user's browser, which is way less efficient than serving a pre-compiled stylesheet. For any real, live website, you'll want to use a proper build process with either the CLI or PostCSS plugin. If you're curious and just want to mess around, you can learn how to set up Tailwind CSS with the CDN in minutes.
Even the smoothest Tailwind CSS install can hit a snag. If you've followed the guide to the letter but your styles are nowhere to be found, don't panic. This happens to everyone, and it's almost always a simple configuration mix-up.
Nine times out of ten, the problem lies in your tailwind.config.js file.
The most common culprit? A misconfigured content array. This little array is mission-critical; it tells Tailwind's Just-In-Time (JIT) engine exactly which files to scan for class names. If a path is wrong or a file extension is missing, Tailwind simply won't see the classes in that file, and they'll never make it into your final CSS.
For example, you might have ./src/**/*.{html,js} in your config, but all your fancy new components are actually .jsx or .tsx files. It's a tiny detail that can bring your styling to a halt. Always take a moment to double-check that your paths perfectly match your project's structure.
Fixing "Styles Not Applying" Errors
When your styles go missing, your first stop should always be the tailwind.config.js file. Open it up and carefully inspect every single line within the content array.
- Check Your File Extensions: Are you building with React or Vue? Make sure you’ve included
.jsx,.tsx,.vue, or.svelteif you're using them. - Verify the Folder Paths: Is your source code in a folder named
./src,./app, or something else? The path needs to be correct relative to where your config file lives. - Hunt for Typos: A simple typo like
/componetsinstead of/componentsis all it takes. The build process won't throw an error; it will just silently fail to generate styles for that entire directory.
Another thing to check is the import order in your main CSS file (often named globals.css or index.css). You need to have these three base directives present and in the correct order:
@tailwind base;
@tailwind components;
@tailwind utilities;If these are missing or mixed up, Tailwind won't be able to inject its styles correctly. And just as important, make sure this CSS file is actually being imported into your app's entry point, like _app.jsx in Next.js or main.js in Vite.
Here’s a classic "gotcha": Your styles look perfect in development, but disappear in the production build. This is almost guaranteed to be a CSS purging issue. Tailwind is super aggressive about removing unused CSS for production, and if you create class names dynamically (like
text-${color}-500), the JIT compiler can't "see" them ahead of time.
The best way to handle this is to avoid building class names with string concatenation. Instead, write out the full class name and use conditional logic to apply it. If you absolutely must use dynamic classes, you can add them to the safelist option in tailwind.config.js to tell Tailwind not to purge them.
Answering Your Top Tailwind CSS Install Questions
As you get your hands dirty with a new tool, a few common questions always seem to pop up. It doesn't matter if you're just spinning up a quick demo or trying to weave Tailwind into a massive existing project—some hurdles are universal. Let's clear up some of the most frequent ones I see people run into.
Can I Use Tailwind CSS Without Node.js?
Yes, you absolutely can. The quickest way to get up and running is with the Play CDN.
All it takes is a single <script> tag in your HTML file’s <head> section, and you’re good to go. This approach is fantastic for rapid prototyping, throwing together a quick demo, or simply learning the framework without the headache of a full build environment.
But here’s the important bit: the CDN is not meant for production. It works by compiling your CSS directly in the browser as the user loads the page, which is a lot slower than serving a pre-compiled, optimized stylesheet. For any real project, you'll want to use the Tailwind CLI or the PostCSS plugin in a Node.js environment to get a lean, production-ready build.
Why Are My Dynamic or Custom Classes Not Appearing?
Ah, the classic "my classes aren't working" problem. If you've run into this, you're not alone. This almost always comes down to how you've set up your tailwind.config.js file.
Tailwind's Just-In-Time (JIT) engine is incredibly efficient because it only generates the CSS you actually use. It does this by scanning the files you list in the content array of your config. If a file isn't listed there, Tailwind won't look inside it, and none of the classes from that file will make it into your final stylesheet.
The same rule applies when you try to build class names dynamically with strings. For example, if you write something like bg-${color}-500 in your JavaScript, Tailwind's scanner can't piece that together at build time. To make it work, you have to write the full, complete class name somewhere in your code (like bg-red-500 or bg-blue-500).
If you absolutely must generate classes at runtime, your best friend is the
safelistoption in your config. It lets you specify class patterns that should always be included in the final CSS, no matter what.
How Do I Add Custom Colors or Fonts to Tailwind?
Customizing Tailwind is one of its greatest strengths. The whole point is to build your design system, not just use a generic one. You can easily add your own design tokens by working inside the theme.extend object in your tailwind.config.js file.
Using extend is key because it adds your customizations on top of Tailwind's defaults instead of wiping them out.
- For custom colors: Just add a
colorsobject insidetheme.extend. You could define your brand palette like this:'brand-primary': '#4F46E5'. Suddenly, utility classes likebg-brand-primaryare ready to use. - For custom fonts: It's the same idea. Add a
fontFamilyobject insidetheme.extendto define your font stacks, like'sans': ['Inter', 'sans-serif'].
This approach gives you the best of both worlds—your own branded design tokens living right alongside Tailwind's comprehensive default set.
What Is the Difference Between the Tailwind CLI and PostCSS Plugin?
Think of it this way: the tool you choose depends on the complexity of your project.
The Tailwind CLI is a simple, standalone tool that does one thing and does it well: compiles your CSS. It's perfect for projects that don't already have a complicated build process, like a simple static website or a project where you want to keep things minimal.
Using Tailwind as a PostCSS plugin, on the other hand, plugs it into a much larger and more powerful ecosystem. Most modern frontend frameworks—think Next.js, Vite, and Svelte—already use PostCSS under the hood. By integrating Tailwind as a plugin, you can easily chain it with other tools like autoprefixer to create a more automated and robust workflow. For any project built on a modern framework, the PostCSS plugin is the way to go.
Ready to build stunning, high-performance UIs with less effort? Magic UI offers a massive library of over 50 customizable blocks and 150+ free animated components built with React, Typescript, and Tailwind CSS. Create beautiful landing pages in minutes and accelerate your development workflow today.