When you kick off a new Next.js project, you’ll typically start with create-next-app. This command-line tool is a lifesaver, setting up a production-ready React framework that comes packed with powerful features like file-based routing and server-side rendering right out of the box. It gives you a solid foundation to build fast, SEO-friendly web apps without getting bogged down in configuration.
Why Choose Next JS for Your Next Project

Before we jump into the code, it's worth taking a moment to understand why so many developers are flocking to Next.js. At its heart, Next.js is a React framework that supercharges the popular library with a whole suite of production-grade features. It tackles common headaches that pop up when building single-page applications (SPAs) with plain React, like subpar SEO performance and sluggish initial load times.
Instead of boxing you into a client-side or server-side corner, Next.js hands you a hybrid solution. This flexibility is its biggest advantage, letting you decide exactly how each page of your application gets rendered.
The Power of Hybrid Rendering
Next.js isn't just one thing—it's a versatile toolkit that lets you mix and match different rendering strategies to get the best possible performance and user experience. This means you can pick the perfect tool for each job.
Here are the main rendering options you'll be working with:
- Static Site Generation (SSG): This approach pre-renders your pages at build time. It’s absolutely perfect for content that doesn’t change often, like blog posts or marketing pages. The result? Blazing-fast load times.
- Server-Side Rendering (SSR): With SSR, pages are generated on the server for every single request. This is your go-to for dynamic content that needs to be fresh, like a user dashboard or an e-commerce product page pulling real-time data.
- Incremental Static Regeneration (ISR): ISR is a brilliant hybrid. It lets you update static pages after they’ve been built. You can serve a speedy, cached version of a page while regenerating it in the background, making sure your content is always up-to-date without sacrificing speed.
This multi-pronged approach lets you build an app that's both incredibly fast and highly dynamic—a combination that used to be a real challenge to pull off. For a deeper dive into its architecture, check out our guide on what is Next.js and its core concepts.
Built for a Better Developer Experience
Beyond raw performance, Next.js is built to make our lives as developers easier. It features a file-based routing system where creating a new page is as simple as dropping a file into a folder. Conveniences like automatic code splitting, optimized image loading, and built-in API routes mean you spend less time messing with config files and more time actually building features.
The real magic of Next.js is that it provides a structured, opinionated way to build React apps that scale. It takes care of the complex parts of web development, allowing you to focus on creating a great product.
This solid foundation has led to massive adoption across the industry. In fact, 17,921 verified companies now use Next.js, including giants like Amazon, Walmart, and Apple. This widespread use, especially in the Business Services sector, really speaks to its reliability for building high-stakes, large-scale applications. You can learn more about the global adoption of Next.js.
Setting Up Your First Next JS Project
There’s no better way to learn than by doing, and the Next.js team has made getting started an absolute breeze. Your main tool for this job is create-next-app, a command-line interface (CLI) that builds out a complete, production-ready project for you. Forget about wrestling with manual configurations and dependencies; this gets you up and running in minutes.
Before you dive in, just make sure you have Node.js version 18.17 or later installed on your machine. You can quickly check this by popping open your terminal and running node -v. If your version is up to date, you’re good to go.
The Create Next App Command
To get the ball rolling, navigate in your terminal to wherever you want your new project to live. Then, run this single command:
npx create-next-app@latest
This kicks off an interactive setup process that will walk you through a few questions. It’s a great way to customize the project to your specific needs right from the get-go.
Answering these prompts thoughtfully is your first big step. The choices you make here—like using TypeScript or setting up Tailwind CSS—will shape your development workflow from day one.
The installer will ask for your input on several options. Here’s a quick rundown of what they mean and my personal recommendations for anyone starting out:
- What is your project named? - Just pick a simple, clear name for your project folder.
- Would you like to use TypeScript? - Go with Yes. The type safety it adds is a lifesaver for catching errors early, especially as your app gets bigger.
- Would you like to use ESLint? - Absolutely Yes. This is a fantastic tool for keeping your code style consistent and flagging potential bugs automatically.
- Would you like to use Tailwind CSS? - Definitely choose Yes. It’s a utility-first CSS framework that feels like it was made for Next.js, making styling incredibly fast.
- Would you like to use the
src/directory? - Yes. It's a common convention to keep your actual application code inside asrcfolder, which helps keep your project organized. - Would you like to use App Router? - Yes, without a doubt. This is the new, recommended routing system and the modern way to build a Next.js app.
Once you’ve made your selections, the CLI will work its magic. It creates a new directory, installs all the packages you need, and even sets up a Git repository for you.
All that's left is to jump into your new project folder (cd your-project-name) and fire up the development server with npm run dev. Your first Next.js project is now live and waiting for you at localhost:3000.
Navigating the Next JS Project Structure
Once you’ve got your project running, pop open the folder in your code editor. You'll see a structure that’s both logical and powerful, and getting a handle on this layout is your next big step. This is where your code lives and how your entire application hangs together.
The star of the show here is the app directory. This folder is home to the App Router, which is Next.js's modern approach to routing. Forget about clunky config files; Next.js uses a file-based system where folders in the app directory directly map to URL paths. It’s incredibly intuitive once you get the hang of it.
The Heart of Your Application
Inside the app folder, you'll find a few critical files that the setup process created for you. These are the foundational pieces of your UI and routing logic.
layout.tsx: This is your root layout, the main shell that wraps your entire application. Think of it as the place for things that never change, like your main navigation, header, or footer. Any UI you add here will be shared across every single page.page.tsx: This file represents the UI for a specific route. The one in the root of theappdirectory controls your homepage, which is the/path. As you build out more pages, you'll be creating more of these.globals.css: Just like it sounds, this is where you put styles that apply to your whole application. It's the perfect spot for CSS resets, base typography, or defining font properties for your site.
This infographic gives you a quick visual recap of how the simple setup process results in this clean project structure.
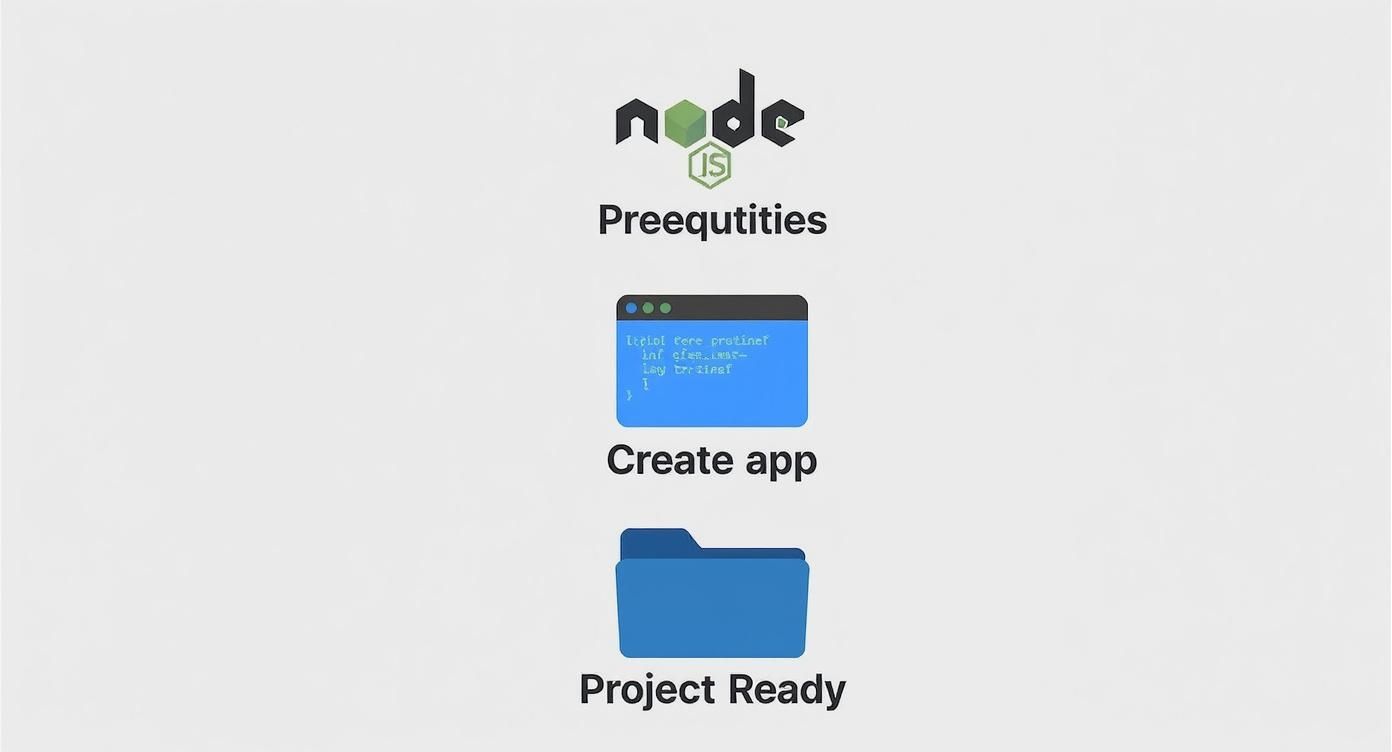
As the graphic shows, you go from checking a few prerequisites to having a ready-to-code project folder, which is exactly what we're exploring now.
Organizing Your Assets and Components
Outside of the app directory, you'll spot a public folder. This folder has a special job: any file you drop in here—images, favicons, fonts—can be accessed directly from your site's root URL. It's the go-to place for all your static assets.
When it comes to your reusable React components, it's a common best practice to create a brand new components folder. You could technically put it inside src or even in the app directory, but keeping it at the root level helps maintain a clean and scalable architecture as your project grows.
To help you get your bearings, here's a quick reference table for the core files and folders you'll encounter.
Next JS Core File and Folder Functions
A quick reference guide to the purpose of key files and folders in a standard Next.js App Router project.
| File/Folder | Purpose and Key Features |
|---|---|
app/ | The core of your application. Contains all routes, layouts, and pages using the App Router. |
app/layout.tsx | The root layout component that wraps every page. Ideal for shared UI like headers and footers. |
app/page.tsx | The homepage for your application, corresponding to the / URL path. |
app/globals.css | The place for global CSS styles that apply to the entire application. |
public/ | A directory for static assets like images, fonts, and favicons. Files here are served from the root URL. |
components/ | A user-created folder (best practice) for storing reusable React components. |
package.json | Manages project dependencies and scripts (e.g., npm run dev). |
next.config.mjs | The configuration file for customizing Next.js behavior, such as adding redirects or image domains. |
This table should be a handy cheat sheet as you start moving around your new project.
The App Router's design has been a huge factor in the framework's success. By tying routing directly to your file structure, it just makes the whole development process feel more natural. Developers really seem to appreciate that.
This focus on developer experience is a big reason for its explosive growth. Next.js now sees an adoption rate of 52.9% among React developers, largely thanks to game-changing features like the App Router. Add in its excellent performance metrics, like a Lighthouse score of 98.6, and it's easy to see why it's a top choice for building fast, modern websites. You can find more insights on frameworks for JavaScript app development on strapi.io.
Building Pages and Adding Navigation

Alright, this is where the magic starts to happen and your project begins to feel like a real website. One of the best things about Next.js, and a feature I've come to love, is its file-based routing system. It's incredibly intuitive. You can forget about wrestling with separate routing libraries or messy configuration files; Next.js just works by looking at the folders you create.
The whole concept is beautifully simple: a new folder in your app directory equals a new URL path. Inside that folder, a page.tsx file provides the actual UI for that route. It's a clean, predictable structure that makes perfect sense from day one.
Creating Your First Pages
Let's get our hands dirty and build out two pages every website needs: a homepage and an "About Us" page. Your project already has a homepage, which you can find at app/page.tsx. Now, let's create the about page.
- Jump into the
appdirectory and create a new folder. Call itabout. - Inside that brand new
aboutfolder, create a file namedpage.tsx.
And that's literally all it takes. You've just created the /about route. Now, let's drop some basic React code into app/about/page.tsx so it actually displays something.
// app/about/page.tsx
export default function AboutPage() {
return (
<main className="p-24">
<h1 className="text-4xl font-bold">About Us</h1>
<p className="mt-4">This is the about page for our first Next.js app!</p>
</main>
)
}With that code in place, Next.js handles the rest. Fire up your browser and navigate to localhost:3000/about, and you'll see your new component rendered on the screen.
This file-based approach is a total game-changer for productivity. You can visualize your entire site's structure just by looking at your file explorer. It keeps everything organized and easy to find.
Implementing Seamless Navigation
Now that you have a couple of pages, you need a way for people to get between them without having to type URLs into the address bar. This is a job for the Next.js <Link> component. It’s what enables client-side navigation, giving you that snappy, single-page app feel by preventing the browser from doing a full-page reload every time you click a link.
To connect your homepage to the about page, you'll import Link from next/link and use it almost exactly like a regular <a> tag. If you want to dive deeper into building a complete navigation bar, there are some great tutorials on building a navbar in React.js that you can easily adapt.
Here’s a quick example of how you could add a link to your app/page.tsx:
// app/page.tsx
import Link from "next/link"
export default function HomePage() {
return (
<main className="p-24">
<h1 className="text-4xl font-bold">Welcome Home</h1>
<nav className="mt-6">
<Link href="/about" className="text-blue-500 hover:underline">
Go to About Page
</Link>
</nav>
</main>
)
}The href prop tells the <Link> component where to go. When a user clicks it, Next.js fetches what it needs in the background and swaps out the view without that classic white flash of a page refresh.
Handling Dynamic Content with Routes
Most real-world applications aren't just static pages. You'll often need to show unique content based on something in the URL, like a specific product ID or a blog post title. Next.js handles this beautifully with something called dynamic segments.
You can create a dynamic route by just wrapping a folder's name in square brackets, like [slug]. For instance, if you wanted to build a blog with URLs like /blog/my-first-post, you'd set up your folder structure like this:
app/blog/[slug]/page.tsx
From inside that page.tsx file, Next.js gives you access to the dynamic part of the URL (in this case, my-first-post) through the component's props. You can then use that slug to fetch and display the right content. It’s an incredibly powerful way to build out entire sections of your site with just a single component file.
Fetching Data The Modern Way
Just about every app you'll ever build needs to get data from somewhere—a database, a CMS, a third-party API, you name it. Next.js makes this surprisingly straightforward, especially with the App Router, which leans heavily on React Server Components right out of the box. This isn't just a minor feature; it's a game-changer for performance and security.
When you fetch data on the server, you're sending a complete HTML page to the browser. Your users see the content almost instantly, and you get to keep all your sensitive API keys and business logic tucked away safely on the server, far from prying eyes. It’s a clean, modern way to sidestep a lot of the classic headaches of web development.
Using Async and Await in Components
One of the coolest things about Server Components is the ability to just drop async/await directly into your component. Seriously. This tidies up your data-fetching logic, making it easy to read and keeping it right next to the UI that actually uses the data. No more wrestling with useEffect or complex state management libraries just to get some information on the screen.
Let's look at a practical example. Say you want to pull in a list of products from a public REST API and display them on a page. Here’s how you could fetch and render that data right inside a page component.
// app/products/page.tsx
async function getProducts() {
const res = await fetch("https://dummyjson.com/products")
if (!res.ok) {
// This will activate the closest `error.js` Error Boundary
throw new Error("Failed to fetch data")
}
return res.json()
}
export default async function ProductsPage() {
const data = await getProducts()
return (
<main className="p-24">
<h1 className="mb-8 text-4xl font-bold">Our Products</h1>
<div className="grid grid-cols-1 gap-6 md:grid-cols-3">
{data.products.map((product) => (
<div key={product.id} className="rounded-lg border p-4">
<h2 className="text-xl font-semibold">{product.title}</h2>
<p className="mt-2 text-gray-600">{product.description}</p>
</div>
))}
</div>
</main>
)
}Did you catch it? ProductsPage is an async function. That one keyword lets you await the getProducts() call right before returning your JSX. It’s an incredibly clean and direct way to handle what used to be a much more complicated task.
A huge behind-the-scenes win here is that Next.js’s built-in
fetchAPI automatically caches your requests. For data that doesn't change often, it's fetched once at build time, and every user gets a cached, instant response. You get a massive performance boost with zero extra effort.
Why This Matters for Your Career
This blend of React’s slick component model with powerful server-side features is why Next.js has absolutely exploded in popularity. Its knack for boosting performance and SEO makes it a go-to for critical industries like e-commerce.
This isn't just talk; the job market reflects it. We're seeing a massive demand for developers with these skills, with Next.js roles seeing an increase of over 41% in job postings year-over-year. Getting good at Next.js isn't just about learning a new tool—it's a smart career move. If you want to dive deeper, you can find more insights about why you should learn Next.js.
Deploying Your First Next.js Application
Building a killer Next.js app is a great feeling, but the real magic happens when you push it live for the world to see. Getting your project online is the final, most rewarding step, and thankfully, it's easier than you might think—especially with a platform built specifically for Next.js.
We're going to focus on deploying with Vercel, the company that created Next.js. Their platform is practically tailor-made for it, offering a smooth, zero-configuration experience that feels like a natural extension of your coding workflow. It’s hands-down the fastest way to get from localhost to a live URL.
The Power of Git Integration
The best way to get your site live is by connecting your project's Git repository—whether it's on GitHub, GitLab, or Bitbucket—directly to Vercel. This unlocks a powerful workflow called Continuous Deployment. Every time you push a change to your main branch, Vercel automatically kicks off a new build and deploys the update. No manual steps, no fuss.
This integration isn't just a convenience; it's a game-changer.
- Automatic Builds: Forget about dragging and dropping files or running manual build commands. Just push your code, and Vercel takes care of the rest.
- Preview Deployments: For every single pull request, Vercel spins up a unique preview URL. This lets you and your team test changes in a real, production-like environment before merging them. It's an incredible safety net.
- Instant Rollbacks: If a deployment goes sideways and introduces a bug, you can roll back to a previous, stable version with a single click.
Connecting your Git repo is the modern standard for web deployment. It automates all the boring, error-prone parts, letting you focus on what you do best: writing code. Your live app stays perfectly in sync with your latest stable version.
Configuring for Production
Before you hit that deploy button, there’s one critical bit of housekeeping: managing your secrets. Things like API keys, database credentials, and other sensitive info should never be hardcoded into your source code and committed to Git. The right way to handle this is with environment variables.
Vercel gives you a dead-simple UI to manage these. Just head to your project’s settings, add your variables, and they’ll be securely injected into both the build process and the runtime environment. This keeps your secrets locked down while making them accessible in your server-side code through process.env.YOUR_VARIABLE_NAME.
Once your repo is linked and your environment variables are in place, deploying is as simple as importing your project on the Vercel dashboard. The platform is smart enough to detect it’s a Next.js app and will apply all the optimized settings for you. One final click, and your application is live, globally distributed on Vercel's edge network for lightning-fast performance.
While there are other great platforms out there like Netlify or AWS Amplify, the native integration from Vercel makes it the most straightforward choice for anyone just getting their feet wet with Next.js.
Common Questions for Beginners
As you start your journey with Next.js, a few questions always seem to pop up. Let's tackle them head-on to clear up any confusion and help you build a solid foundation right from the get-go.
Is Next.js a Backend or Frontend Framework?
This is easily one of the most common points of confusion for newcomers, and the answer is simple: it’s both. Next.js is a full-stack framework that sits on top of React.
It’s brilliant at building the interactive, beautiful user interfaces you see in a browser (the frontend), but it also packs a punch on the server. It handles server-side logic like rendering pages before they hit the browser, fetching data securely, and even creating your own API endpoints (the backend). This hybrid approach is what makes it so incredibly powerful.
The real magic of Next.js is how it blurs the lines between client and server. You can write your frontend and backend code in the same project, sometimes even in the same file, which makes for a remarkably seamless development experience.
Do I Need to Know React First?
Yes, you absolutely do. Think of it this way: Next.js is a powerful toolkit for React, but it assumes you already know how to use the base tools. Having a solid grasp of React fundamentals is crucial for a smooth ride.
Before you dive headfirst into Next.js, make sure you're comfortable with these core React concepts:
- Components: You should know how to create, compose, and manage component state with hooks like
useState. - Props: Be confident in passing data down through your component tree.
- JSX: You'll need to be fluent in writing that HTML-like syntax inside your JavaScript.
- Hooks: A good handle on
useEffectfor managing side effects will be particularly helpful.
Trust me, a strong React foundation will make learning Next.js feel much more intuitive and less like a steep climb.
What Is the Difference Between Pages Router and App Router?
When you start a new project today, you’ll be prompted to use the App Router, and for good reason—it’s the modern, recommended way forward. The older Pages Router was the original method for building Next.js apps.
Here's a quick breakdown of what that means for you:
- App Router (app/): This is the new standard. It's built around React Server Components by default, which improves performance by shifting more work to the server. It also introduces game-changing concepts like layouts, loading UIs, and error boundaries that are all tied directly to your file structure.
- Pages Router (pages/): This is the legacy approach. It defaulted to client-side rendering for each page and had a different system for API routes (they lived in
pages/api).
For any new project, just stick with the App Router. It’s where all the exciting new features and performance boosts are happening.
When Should I Create an API Route?
One of the coolest things about the App Router and Server Components is that you can often fetch data directly without needing a separate API route, especially if that data is just for your own Next.js application. But API routes (now called Route Handlers) are still incredibly useful.
You'll want to create an API route when you need to:
- Expose data to external clients: This is perfect if you're building a mobile app, a third-party service, or another frontend that needs to pull data from your application.
- Handle webhooks: You'll need a dedicated endpoint to receive callbacks from services like Stripe for payments or GitHub for repository events.
- Proxy requests: API routes are great for hiding a complex backend or combining multiple microservices behind a single, clean URL for your frontend to talk to.
As you get started, it's also worth thinking about the bigger picture and the enduring importance of learning to code in our ever-changing tech world. Getting a handle on these core concepts is what gives you the power to build truly robust, full-stack applications from the ground up.
Ready to build stunning, high-performance web interfaces with less effort? Magic UI offers over 150 free and open-source animated components built with React, Typescript, and Tailwind CSS. Accelerate your development and create beautiful landing pages in minutes.