Handling file uploads in a React JS application is a task you'll run into sooner or later. It all starts with capturing a file from a user’s device with an <input type="file"> element. From there, you'll need to manage its state inside your component and package it up for the server, which usually means wrapping it in a FormData object.
Building Your First React File Uploader

Alright, let's jump right in and get a basic file uploader working. We'll skip the boilerplate and cut straight to the core logic. The goal is to grab a file from the user's browser and get it ready for its journey to the server. It all kicks off with a simple HTML input, but making it play nice with React requires a little finesse.
The process has two main parts. First, the user picks a file using an <input type="file"> element. We'll then stash that file in our component's state, which is a perfect job for the useState hook.
The second part is actually sending it off. Once the file is selected, it needs to be sent to a server endpoint. While you can definitely use the native fetch API, a library like Axios often makes life easier with a cleaner syntax and more robust request handling.
Capturing the Selected File
The heart of any file uploader is the <input type="file" /> element. To keep track of the selected file within a React functional component, we'll turn to the useState hook. It's built for exactly this kind of state management.
We can initialize a state variable—let's call it selectedFile—to null. Then, we'll create a handler function that updates this state every time the user chooses a file. This function gets wired up to the input's onChange event.
import React, { useState } from "react"
const FileUploader = () => {
const [selectedFile, setSelectedFile] = useState(null)
const handleFileChange = (event) => {
// Access the selected file from the event
setSelectedFile(event.target.files[0])
}
return (
<div>
<input type="file" onChange={handleFileChange} />
</div>
)
}With this simple setup, we've successfully grabbed the file and stored its details in our component's state. It’s now ready for the next step. Writing clean, maintainable code is key, and if you want to sharpen your skills, check out our guide on https://magicui.design/blog/react-best-practices.
Preparing the File with FormData
Before we can shoot the file off to a server, it needs to be packaged correctly. The web standard for file uploads is multipart/form-data encoding, and the FormData interface is our go-to tool for this. It lets us build a set of key/value pairs that mimic a form submission, which is exactly what we need for an HTTP request.
A common mistake is trying to send the raw file object in a JSON payload. Servers expect
multipart/form-datafor file uploads, andFormDatais the browser's native tool for creating exactly that.
To use it, we'll create a new FormData instance and simply append our file to it. This object can then be passed as the body of a POST request using Axios or fetch. As you build out these common patterns, it's worth looking into how modern AI tools for developers can help speed up your workflow.
With the file properly packaged, we're ready to tackle the final piece of the puzzle: sending it to the server.
Sending Files to the Server with Axios
Alright, so you've got your file wrapped up nicely in a FormData object. Now what? The next step is to actually get it from the user's browser over to your server. This is where we need to make an HTTP request, and my go-to tool for this in the React world is Axios.
Axios is a super popular, promise-based HTTP client that just makes sending requests a breeze. Its clean syntax and powerful feature set have made it a staple for countless developers. For a React JS file upload, we’ll be making a POST request, and that FormData object we just built will be the payload.
Building the Axios POST Request
Putting the request together is pretty straightforward. I'm a big fan of using async/await because it keeps the asynchronous code clean and easy to read, almost like it's happening in order. You just call axios.post() and pass it two main things: your server's endpoint URL and the FormData object.
Now, here's a crucial tip that trips up a lot of developers. When you're using FormData, don't manually set the Content-Type header. Axios is smart enough to see the FormData object and automatically set the header to multipart/form-data for you, along with the necessary boundary string. If you try to set it yourself, you'll likely break the upload. Just let Axios handle it.
Let's see what this looks like in practice. Here’s a simple function that takes our FormData and ships it off to a /upload endpoint.
import axios from "axios"
const uploadFile = async (formData) => {
try {
// Make sure to replace '/upload' with your actual server endpoint
const response = await axios.post("/upload", formData)
console.log("File uploaded successfully:", response.data)
return response.data // You might want to return this to update the UI
} catch (error) {
console.error("Error uploading file:", error)
// It's a good practice to re-throw the error so the calling component can handle it
throw error
}
}When you're building your Axios request, there are a few key configuration options you'll want to be aware of, especially for more advanced scenarios like tracking upload progress.
Here's a quick rundown of the essential properties for a file upload request:
Axios Configuration for File Upload
| Property | Value/Type | Purpose |
|---|---|---|
| url | string | The server endpoint where the file will be sent (e.g., /api/upload). |
| method | string | The HTTP method to use. For file uploads, this is almost always 'post'. |
| data | FormData | The FormData instance containing the file and any other associated data. |
| headers | object | An object for custom headers. Remember to let Axios set the Content-Type. |
| onUploadProgress | function | A callback function that receives progress events during the upload. |
These properties give you fine-grained control over the request, allowing you to build a robust and user-friendly upload experience.
Handling What the Server Sends Back
Once Axios sends the request, your server will process it and send back a response. A successful upload might return some JSON with the file's new URL or a database ID. On the other hand, an error could be triggered if the file is too large, the wrong type, or something just goes wrong on the server.
Your component needs to be ready for either outcome. By wrapping the Axios call in a try...catch block, you can easily separate success from failure. This is where you'll update your UI to show a success message, display a preview of the newly uploaded image, or provide the user with a clear, helpful error message.
The feedback loop is everything for a good user experience. A silent failure is one of the most frustrating things for a user. Always use the server's response to tell the user exactly what happened—good or bad.
This back-and-forth communication is what transforms a simple file input into a complete, interactive, and professional feature.
Creating a Modern Dropzone and File Previews
Sure, a plain old "Browse" button works. But let's be honest, it doesn't exactly scream "modern" or "user-friendly." If you want to elevate the experience of your React JS file upload component, there are two features users pretty much expect these days: a slick drag-and-drop zone and instant image previews.
Adding these touches makes your application feel way more intuitive and responsive. We'll turn a simple <div> into an interactive area that reacts when a user drags a file over it, giving them a much faster way to get their files into your app.
Building an Interactive Dropzone
To pull this off, you'll need to hook into three main browser events in your React component: onDragOver, onDragLeave, and onDrop.
The onDragOver event is absolutely crucial. By default, browsers will just open any file you drop onto the page, which is not what we want. We have to step in and prevent that default behavior to take control.
onDragOver and onDragLeave are also perfect for giving the user visual cues. Think about toggling a CSS class to change the border color or showing a "Drop file here" message. This kind of feedback makes it obvious that the area is interactive and ready for their file.
The real magic happens in the onDrop event. Here, we'll again prevent the browser's default action and then grab the dropped files from the event’s dataTransfer.files property. This FileList object is what we'll pass along to our state and upload functions.
Heads up: The most critical step here is calling
event.preventDefault()in bothonDragOverandonDrop. It's a super common mistake to forget this, and the result is the browser hijacking the file and navigating away from your app. It completely breaks the user flow.
Generating Instant File Previews
Once a user has picked a file—whether they dropped it or used the classic input—you want to give them immediate feedback. Instead of leaving them hanging until the upload finishes, we can generate a local preview of image files right there in the browser. It’s a small thing that makes the app feel incredibly fast.
The key to this is the browser's built-in FileReader API. It's a handy tool that lets us read the contents of a file on the client-side.
Here’s how the process breaks down:
- Create a FileReader: Inside your file selection handler, make a new instance of
FileReader. - Set up the
onloadcallback: This function fires once the file has been successfully read. The result comes back as a Base64 encoded data URL, which is exactly what we need. - Read the file: Call the
readAsDataURL()method on your reader, passing in the file the user selected. - Update your state: Inside that
onloadcallback, take the data URL and set it in your component's state. You can then plug this URL directly into thesrcof an<img>tag to show the preview.
This client-side preview gives the user instant confirmation and a much richer experience, all without a single call to your server.
And if you're looking to style these new UI elements, our guide on how to install Tailwind in a React project will get you up and running with a professional look in no time.
Showing Real-Time Upload Progress
Nobody likes staring at a static screen, wondering if their upload has frozen. It's one of the quickest ways to frustrate a user, especially when they're trying to send a large file. A simple, dynamic progress bar is the perfect antidote, giving them clear, real-time feedback that everything is working as it should.

Thankfully, when you're doing a React JS file upload with Axios, getting this data is surprisingly easy. Axios comes with a built-in event listener called onUploadProgress that gives you a live feed of the upload's status straight from the browser.
Tapping into the onUploadProgress Event
The onUploadProgress function is just another configuration option you can pass into your Axios request. It's a callback that fires repeatedly as the file makes its way to the server.
This callback provides a progress event object packed with useful info. We're most interested in two properties: loaded (the number of bytes uploaded so far) and total (the file's total size). With those two numbers, a quick bit of math gives us the upload percentage, which is exactly what we need to power our UI.
Here’s how you can weave it into an existing Axios call:
import React, { useState } from "react"
import axios from "axios"
const ProgressUploader = () => {
const [uploadPercentage, setUploadPercentage] = useState(0)
const uploadFile = async (file) => {
const formData = new FormData()
formData.append("file", file)
try {
await axios.post("/upload", formData, {
onUploadProgress: (progressEvent) => {
const { loaded, total } = progressEvent
// A simple check to avoid division by zero
if (total > 0) {
const percent = Math.floor((loaded * 100) / total)
setUploadPercentage(percent)
}
},
})
} catch (err) {
console.error("Upload failed:", err)
// Maybe reset percentage or show an error state
setUploadPercentage(0)
}
}
// Your file input and handler logic would go here
// ...
}Linking Progress to the UI
Inside the callback, the setUploadPercentage(percent) call updates our component's state. From there, it’s a breeze to connect this state to a visual element, like a progress bar. You don't need a fancy library for this; a couple of styled div elements will do the trick.
The outer div works as the container, and the inner div gets its width set dynamically from our uploadPercentage state.
const ProgressBar = ({ percentage }) => {
return (
<div
className="progress-bar-container"
style={{ width: "100%", backgroundColor: "#e0e0de", borderRadius: "4px" }}
>
<div
className="progress-bar"
style={{
width: `${percentage}%`,
backgroundColor: "#4caf50",
height: "20px",
borderRadius: "4px",
transition: "width 0.4s ease-in-out",
}}
/>
</div>
)
}This small addition completely transforms the user experience. It's a common pattern in enterprise-grade React apps for a reason. Showing real-time upload status reduces user uncertainty, especially for operations that might take a few seconds or longer. It makes the wait feel shorter and keeps users engaged. For a deeper dive into this, check out these insights on React and Node.js file handling.
The key takeaway is that providing visual feedback isn't just a nice-to-have feature; it's essential for usability. A progress bar turns a moment of potential user anxiety into a clear and controlled process.
Uploading Large Files with Chunking
When your application needs to handle seriously large files—think high-resolution videos, massive datasets, or chunky design assets—the standard, single-request upload just doesn't cut it. It’s a fragile process. Network timeouts, server-side file size limits, and spotty connections can nuke the entire upload, forcing a frustrated user to start all over again.
This is exactly where chunking comes in. It’s a more advanced and robust technique for a React JS file upload that completely changes the game.
Instead of trying to shove the whole file through the network in one go, chunking breaks it down into smaller, more manageable pieces right in the browser. This approach is far more resilient. If one chunk fails to upload, you only need to retry that small piece, not the entire gigabyte-sized file.
Slicing Files in the Browser
The real magic behind client-side chunking is the Blob.slice() method. It's a native browser API that lets you take a large File object—which is just a special type of Blob—and create smaller segments without having to load the entire file into memory.
You can set a fixed chunk size, say 5MB, and then loop through the file, slicing it up piece by piece.
Each chunk is then wrapped in its own FormData object and sent to the server, one after the other. Your React component will need to carefully manage the state for this, keeping track of which chunk is currently uploading and how many are left to go.
This flow is a great way to visualize the validation and error-handling that should go along with this strategy.
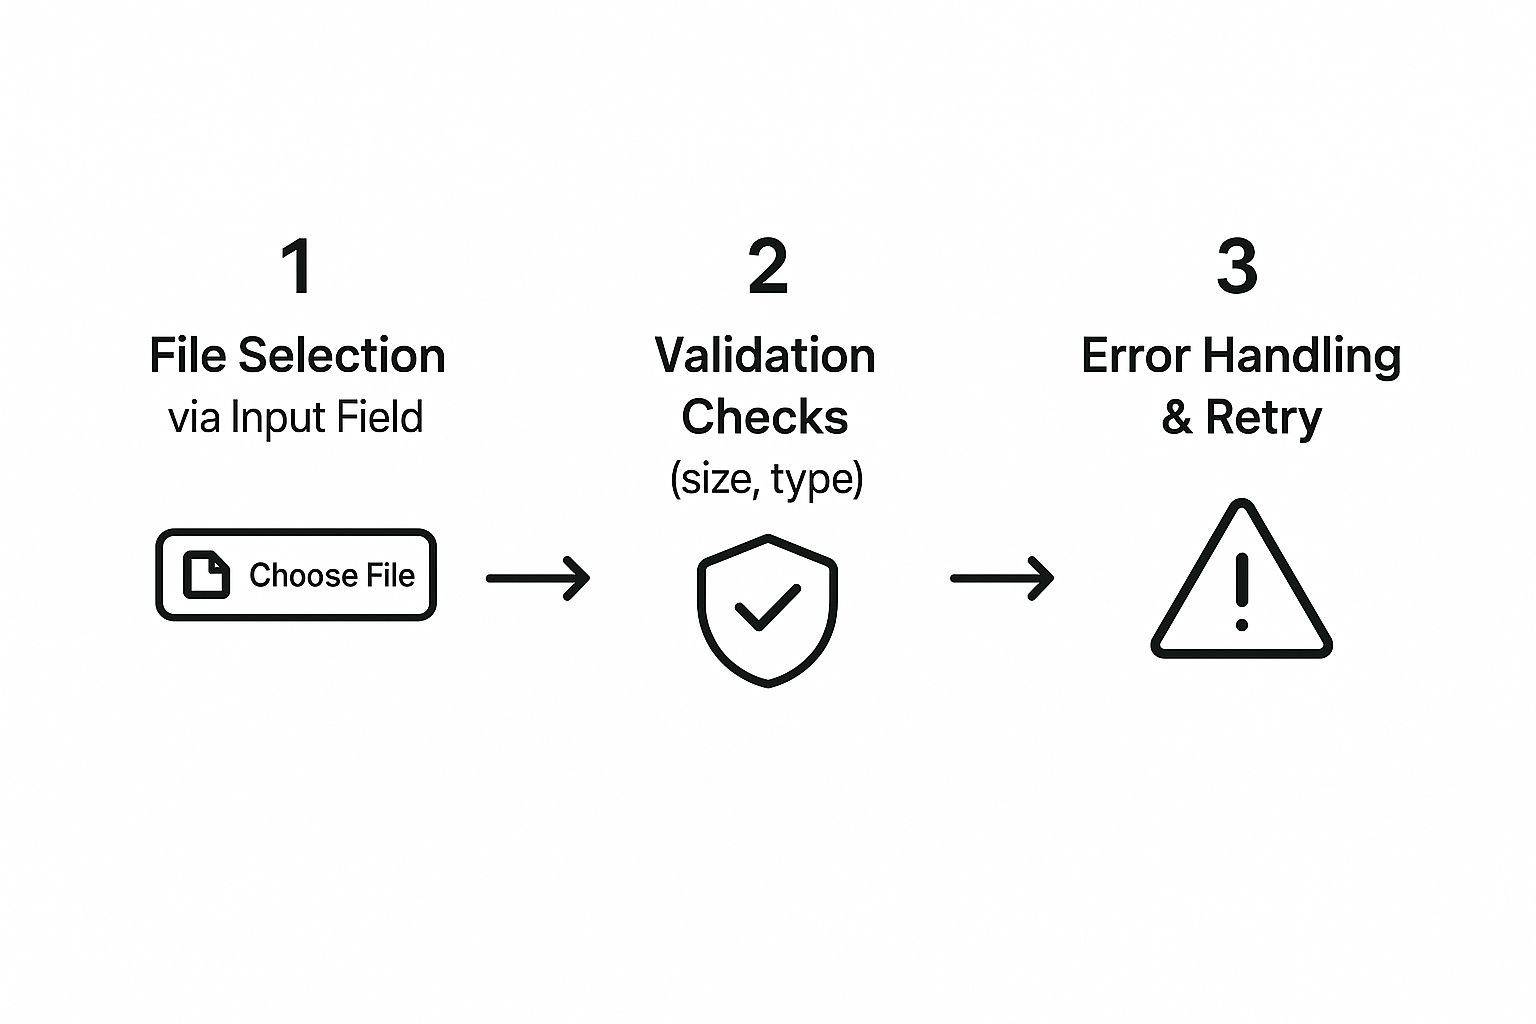
As you can see, validation and retry mechanisms are critical checkpoints. They're what ensure data integrity before the upload process even kicks off.
Assembling Chunks on the Server
On the backend, your server will start receiving these individual chunks. It needs two key pieces of information for each one: which file it belongs to and its correct order.
A common strategy is to send a unique identifier for the entire file along with an index number for each chunk. The server then saves these temporary pieces. Once all the chunks have arrived safely, it reassembles them back into the original file.
This method is the key to building resilient, enterprise-level upload features. It transforms a fragile, all-or-nothing process into a fault-tolerant system that can reliably handle large assets even over spotty network conditions.
Slice-based uploads are a best practice for any application where users are uploading large, high-value content. For instance, when dealing with high-resolution images, the upload is just one part of the puzzle; delivery is another. If that's something you're working on, you might find our article on how to optimize images for the web helpful.
Ultimately, the chunking approach minimizes failure risk and enables precise progress tracking, which adds up to a much better user experience.
Common Questions About React File Uploads

As you start building out your React JS file upload features, you’re bound to hit a few common roadblocks. It happens to everyone. Let's walk through some of the most frequent questions developers ask so you can sidestep those potential issues and refine your implementation.
Getting these details right is what separates a merely functional uploader from a truly robust and user-friendly one. From juggling multiple files at once to making sure only the right types of files get through, these are the practical challenges you'll almost certainly run into.
How Do I Handle Multiple File Uploads
To let users grab more than one file, you just need to add the multiple attribute to your input element: <input type="file" multiple />. Simple as that. Once you do this, event.target.files won't just hold a single file; it becomes a FileList, which you can treat much like an array.
From there, you can loop over the FileList and append each file to your FormData object before sending it on its way. I find that a for...of loop is a clean and effective pattern for this.
For a smoother user experience, especially when dealing with a bunch of files, think about managing each upload's state individually. This lets you show separate progress bars for each one. Another slick approach is using Promise.all to handle all the uploads concurrently and track when the entire batch is finished.
What Is the Best Way to Validate Files
Client-side validation is your first line of defense. It gives the user instant feedback without waiting for a server round-trip, which is a much better experience. You should be checking for two main things: file type and size.
-
File Type: Use the
acceptattribute on your input, like<input accept=".jpg,.png" />, to give the browser a hint about what files are okay. But don't stop there. In your change handler, you need to actually inspect thefile.typeproperty (e.g.,'image/jpeg') and check it against a list of approved MIME types. -
File Size: Check the
file.sizeproperty, which gives you the size in bytes. You can set a reasonable limit, for example, usingif (file.size > 5 * 1024 * 1024)to block any file over 5MB.
If a file fails either of these checks, make sure you update your component's state to show a clear and helpful error message to the user.
A crucial takeaway here: client-side validation is for UX, not security. A determined user can easily bypass it. You absolutely must re-validate everything on your server before processing or storing any file.
Beyond the code itself, it's vital to think about the broader data security considerations when handling user files. Proper server-side validation is a non-negotiable part of that puzzle, protecting you from major security risks.
Can I Upload Files Without Axios
Absolutely. The native fetch API is more than capable of handling file uploads. You’ll build the FormData object in the exact same way and just pass it as the body of your POST request.
The main trade-off comes down to progress tracking. fetch doesn't have a simple, built-in progress event like Axios's onUploadProgress configuration. If you need to show an upload progress bar with fetch, it gets a lot more complex, often forcing you to work directly with ReadableStream.
Because of this, many developers (myself included) still prefer Axios for file uploads when progress feedback is a key requirement. It just saves you a headache.